Photographers who inspire me
Chris McCaw
Chris’ interest in photography started at a young age, experimenting and learning the ropes in the darkroom from the age of 13. Since then he has continued to photograph his life, from skateboarding to zine/punk scenes using fisheye lens and Tri-X. Once he finished High School Chris learned as much as he could about photography, finally falling in love with platinum/palladium printing process in 1993 which he uses in his works today.

Alex Kovaleff
Alex Kovaleff was born in 1927 in the Vosges. After being passionate about ceramics for many years, he discovered his true vocation in 1956: the photograph. Self-taught, he was restricted by no teachings or rules and therefore created a very personal style. Kovaleff used the Sabattier effect, commonly known as solarisation — a process which consists of briefly exposing the film to daylight during the development of the photos. For a long time, it was thought that this technique would not be applicable to colour photographs; However after many tests and experiments, the solution was found.

Alex Kovaleff — Expo solarisations argentiques Alex Kovaleff — City-Paris.org. 2018. Expo solarisations argentiques Alex Kovaleff — City-Paris.org. [ONLINE] Available at: http://www.city-paris.org/culture/expo-solarisations-argentiques-alex-kovaleff/. [Accessed 15 January 2018].
Edward Weston
Weston was born in Chicago 1886 and at 21 years old moved to California. From an early age Edward realised that he wanted to be a photographer and initially his work was typical of the soft focus pigment that was popular at the time. However, in a few years he left the style and became one of the main champions of highly detailed photographic images. In 1937 Weston was the first photographer to receive a Guggenheim Fellowship, and over the next two years he produced nearly 1,400 negatives using his 8 × 10 view camera. I find his work very intriguing, I like how he photographs objects from an unusual close up perspective so that it is not necessarily obvious what the object is at first as the focus is of the patterns found in a part of the object rather than the entire object itself. To make a black and white print in a darkroom does not include the use of ink. The density in a black and white darkroom print is in fact silver metal. The silver is coated with gelatin to hold it in place. There are two essential chemical steps, Develop and Fix, with an optional Stop between them. The first solution is called a developer since it develops the latent image formed in paper by the enlarger exposure. The second optional step uses a so-called stop bath. The only purpose of this is to stop development by converting the print from being slightly alkaline to slightly acid. This has the effect of extending the life of the fixer so that more prints can be processed. The final essential chemical step is fixing with a fixer solution. This makes the print stable to light by removing surplus silver that hasn’t been used in forming the image on the paper. If you miss out this final step the print will go black when you turn on the room lights. The final step is to wash the print in running water.

Tate. 2018. Edward Weston 1886–1958 | Tate . [ONLINE] Available at: http://www.tate.org.uk/art/artists/edward-weston-2720. [Accessed 20 January 2018].
Darkroom Dave. 2018. Making Your First Black and White Print | Darkroom Dave. [ONLINE] Available at: http://www.darkroomdave.com/tutorial/making-your-first-black-and-white-print/. [Accessed 20 January 2018].
Image — Edward Weston — Roasted Brussels Sprouts with Lemon & Parmesan | Feasting on Art. 2018. Edward Weston — Roasted Brussels Sprouts with Lemon & Parmesan | Feasting on Art. [ONLINE] Available at: http://www.feastingonart.com/2012/05/edward-weston-roasted-brussels-sprouts-with-lemon-parmesan.html. [Accessed 20 January 2018].
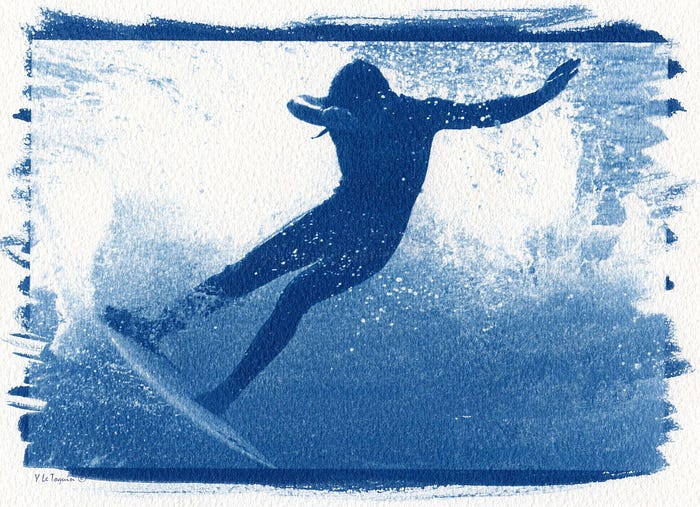
Yannick Le Toquin
Based on a print process invented in 1842 by Sir John Henry Herschel, Yannick Le Toquin has started to revive the process using modern and archival surf imagery entirely from France. Yannick’s work was primarily based off black & white film, but as of recent he’s begun expanding his experiments into a mix of digital and various analog formats. To create a cyanotype print Yannick uses a negative from digital or analog photos, puts a photosensitive product (potassium ferricyanide and a solution of ferric ammonium citrate) on some paper with a brush, like watercolor paper or canvas. Keep the paper in the dark during the drying process. The negative is then put down on the paper with a glass, then placed in the daylight for a few minutes to allow reaction with the UV light rays. I think Yannick’s use of cyanotype to print retro photos of surfing is a wonderful way of echoing the blues of the ocean and creates really aesthetically pleasing final prints.
Cyanotype Photography by Yannick Le Toquin — Korduroy.tv. 2018. Cyanotype Photography by Yannick Le Toquin — Korduroy.tv. [ONLINE] Available at: http://www.korduroy.tv/2015/cyanotype-photography-by-yannick-le-toquin/. [Accessed 20 January 2018].
